Change the Arduino code
info
This section is optional!
Required equipment#
To keep the Scout's price more accessible, it doesn't come with a built-in USB controller chip, so, out of the box, you can't easily hook it up to your computer as-is.
Thankfully, that USB chip is readily available as a cable, which you can connect between your Scout and your computer.
These cables have been tested and confirmed to work with the Scout:
- FTDI Serial TTL-232 USB Cable from Adafruit
- USB Serial Cable from Cornfield Electronics
- FT232RL FTDI USB to TTL Serial Adapter from HiLetgo
note
Successfully use a different brand of cable? Contact me and I can add it to the list.
Steps#
Ready to experiment and get your hands dirty with some code?
- Install the Arduino IDE and follow their instructions to install whatever drivers you'd need for an Arduino Uno.
- With the Scout's power off, connect the Scout's UART header to your computer using one of the cables listed above.
- The Scout's UART header has "B" and "G" labels on its sides to match the cables Black and Green wires.
- The cable provides power to the Scout, so it should now be on and working normally
- Double check that the power switch is OFF! Leaving it on can permanently damage the microcontroller or batteries!
- In the IDE, under "Tools->Board", select "Arduino Uno". Under "Tools->Port" select your new cable; its exact name will depend on the brand. If you're not sure which it is, try unplugging and restarting the IDE -- whichever it was will no longer be listed, so you'll know which it is when reconnecting and restarting.
- Download the code from this repo and load
arduino/scout.inoin the Arduino IDE. You'll also need theCircularBufferandKeypadlibraries, so open up "Tools->Manage libraries" and search for those to install them.- Try uploading this to the Scout by going to "Sketch->Upload". If it works, after 10 seconds or so, it will blink just like it does when you switch its power on. If it doesn't work, the IDE will print out an error that you can google to find out how to fix.
- Experiment with the
octaveandglidevalues at the top ofscout.inoand observe how your Scout has changed its sound.
- "Blink"
- The Arduino IDE has a default program called "Blink" (available in "File->Examples->Basics->Blink").
- After uploading, the Scout won't be playable anymore but one of the colors on the RGB LED should blink off and on.
- Try changing the delay values in the example to make it blink faster or slower.
- Follow the steps above to bring the original Scout code back.
Serial debugging#
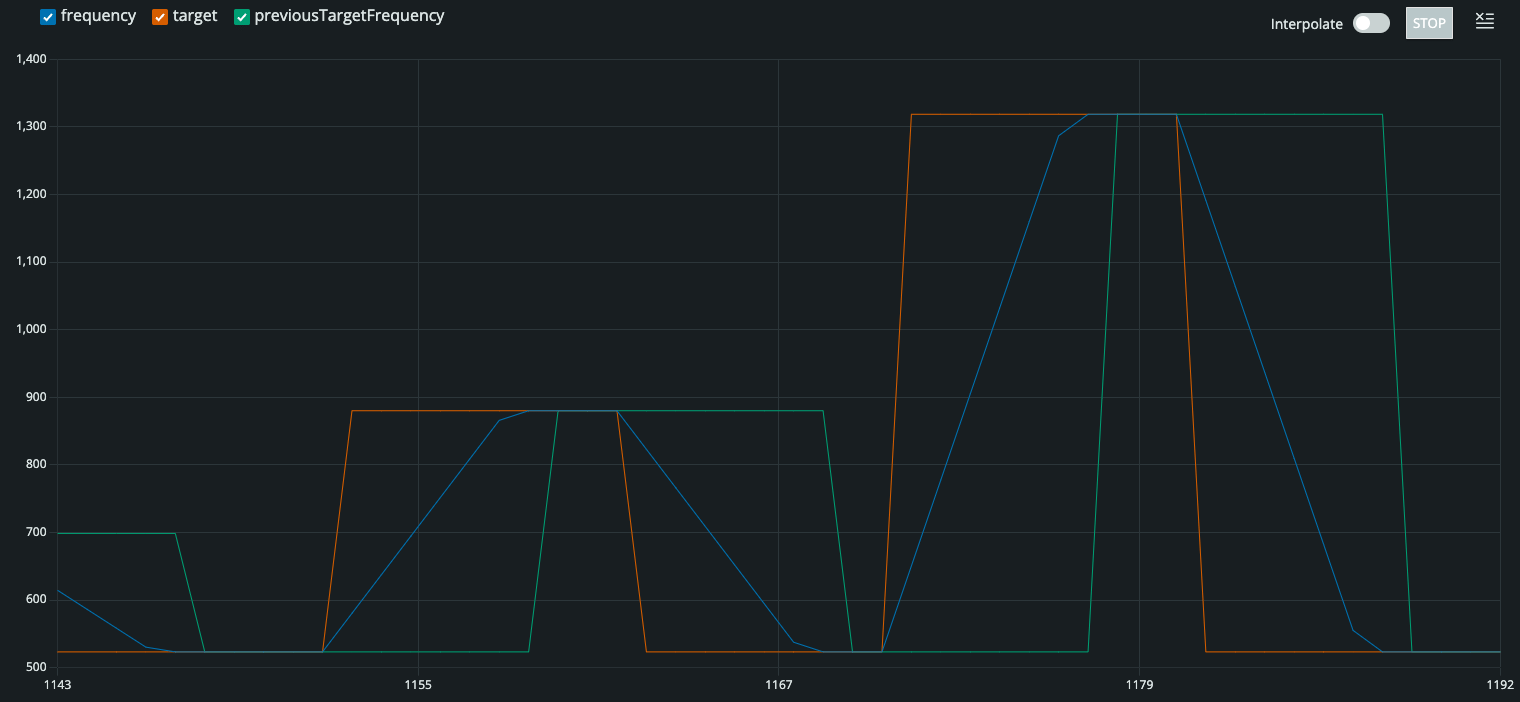
Check out the printToSerial variable at the top of scout.ino. Setting it to true and opening up the Arduino's Serial Plotter while playing notes will visualize the notes being held and how the playing frequency glides between its targets.
Now swap frequency.print(); in the loop() for buffer.print(); and switch to the Serial Monitor, and you'll get a running list of the indexes of the key(s) the Scout sees being played.
note
All this observation slows down the Scout's performance/glide. Remember to put printToSerial back to false before disconnecting from your computer!
Pins#
Once you're comfortable with the Arduino code and really want to expand on what the Scout can do, take a look at the unpopulated HACK header on the PCB. It exposes all the unused pins on the ATmega328 that are safe to use for whatever you'd like:
| HACK | ATmega pins | Description |
|---|---|---|
| VCC | n/a | Voltage from batteries or USB |
| A0-A5 | 23-28 | Analog pins |
| D12 | 18 | There's only one unused digital pin, and this is it |
| SWC, SW1-SW3 | 16; 6,11,12 | Unused spots in the key matrix |
| GND | n/a | Ground |